DataMinder is a framework for building, running and monitoring processes that in some way modify data.
DataMinder stores data in a data table that is sent to each plugin in the current process to perform some work on it (e.g. clean up data), add new data (e.g. from database, file, web service call) or write data somewhere (e.g. database, file or mail).
I don't read manuals. Get me to a minimal "Get started" further down the page

With DataMinder you can:
When building processes, you combine DataMinder plugins which are small, configurable building blocks that implement some specific function. The following plugin types exist today:
By combining the plugins into processes, DataMinder can be used to solve a lot of common problems facing programmers or IT administrators e.g.
All plugins are run and managed by DataMinder so you can focus only on the problem instead of spending energy on just getting the surrounding systems to work.
By combining existing plugins into processes or building new plugins only your ingenuity and imagination set the limit to what you can do with DataMinder.
With DataMinder you can quickly build automated data flows by combining plugins into processes. Processes can read/write data, modify data etc.
Key concepts:
The basic workflow:
With DataMinder you:
Give it less then 5 minutes and you will understand how to work with DataMinder.
The absolutely quickest way to start working with DataMinder is to build a very simple process with one task e.g. creating unique uids (unique identification) and test run it. Let it be accessible by web service interface where a parameter specifies the number of uids to create.
Create simple process with one task to generate uids and return them by web service call
 tab
and add the following 3 plugins to toolbox with
tab
and add the following 3 plugins to toolbox with 
 tab.
Create
tab.
Create  a category named : "My processes".
 to
Drag’n’Drop Service "HTTP Web Service" from toolbox to the category
and double click the service plugin to configure. Now you have activated a HTTP/HTTPS
web service.
under category "My processes" named : "Get uids" (or whatever name you prefer).
to
Drag’n’Drop Service "HTTP Web Service" from toolbox to the category
and double click the service plugin to configure. Now you have activated a HTTP/HTTPS
web service.
under category "My processes" named : "Get uids" (or whatever name you prefer). to Drag’n’Drop Listener "HTTP Listener" and double click it to configure.
 to Drag’n’Drop Task "Generate Uid" and double click it to configure.
And check that the process returns JSON data:
    {
    "columns":["Number of values to create","UID"]
    ,
    "data":[
    ["10","zwymETliyE2tsyJZcDDI"]
    ,["","X1tFU7PslEByoczSwBSg"]
    ,["","LKWwqESp6cVR0UxqCdSn"]
    ,["","cXT9vTQHUi7KDU7Nx5xm"]
    ,["","XU99g0CngBXVj7UBphXX"]
    ,["","fJSygZQAujlTIrNpESlT"]
    ,["","nYj8FDXSXH3Gm0rJkqla"]
    ,["","R6AQQX75kG6bJcTjGIX4"]
    ,["","c4qFMypOpZEdwIqAVMSq"]
    ,["","imr3TpTLUdPeQ7g9tzF5"]
    ]
    ,
    "results":[
    {"index":"1","objectType":"Task","objectName":"Generate Uid","objectId":"9R",
      "result":{"status":"OK","info":""}},
    {"index":"2","objectType":"Process","objectName":"Get uids as web service","objectId":"9T",
      "result":{"status":"OK","info":""}}]}
If you need to call the process with another parameter e.g.
http://127.0.0.1:9080/getUids?count=10 you
can always add the rename columns task first
to rename the column from "count" to "Number of values to create" before calling "Generate Uid" task.
Please see: DM Basic Plugins > Table > "Rename Columns"
If you want to remove the input parameter "Number of values to create" from response you can
add the remove column task last in the process flow.
Please see: DM Basic Plugins > Table > "Remove table columns"
In case you jumped over the key concepts we recommend you to have a look at DataMinder key concepts.
If you have a previous version of DataMinder installed you should probably upgrade. If not you should do a new install.
In this document we will refer to: /DataMinder root directory as {DM_ROOT}
In order to run DataMinder there must be a Java runtime installed for your platform. You need to install the latest Java 8 Runtime from: http://www.oracle.com/technetwork/java/javase/downloads/index.html
If available install the Server runtime which is optimised for server environments. You do not need the Java JDK which is the "Java Development Kit" containing tools you do not need running DataMinder.
After you installed Java runtime verify you have the correct version as:
java -version
The response should start with "1.8." and be similar to:
java version "1.8.0_162"
NOTE : To install make sure that all ports are available e.g. no previous DataMinder or other program is using the ports. Ports under 1024 may require root or administrator access if they are to be used.
NOTE Windows: When installing on windows the total path may not be more then ca 256 character long. Therefore we recommend to install DataMinder in a location with no more then 50-70 characters. More information here.
Download DataMinder DOWNLOAD.
NOTE : To update make sure that all ports are available e.g. no previous DataMinder or other program is using the ports. Ports under 1024 may require root or administrator access if they are to be used.
If you want the previous configuration available in the new installation you may copy the /Server/Config folder. It contains all the properties, runnables, external plugins etc.
The recommended flow for upgrade is:
To install new licences go to the Monitor tab and open the licence management
dialog  . Either upload a licence
file manually or add a licence download URL.
. Either upload a licence
file manually or add a licence download URL.
To use strong encryption you need to update Java. The reason this is not included in Java by default is that US has restrictions of which countries may download strong encryption components and which may not.
If you like you can download the "Java Cryptography Extension (JCE) Unlimited Strength Jurisdiction Policy Files" here. And follow the instructions given there.
In this part we will go through some more extensive examples of how you can build and configure DataMinder.
To illustrate how to work with DataMinder we start with 2 simple problems that show key concepts of how DataMinder works and what you could do with it.
Disclaimer: The problems are intentionally very simple to illustrate the workflow and concepts without getting stuck in implementation details. Of course you could easily imagine real situations with similar (but more complex) problems.
Each day a CSV (comma-separated values) file is uploaded from our partner company to our ftp server with customer user data. It contains columns FirstName and LastName of customers that registered with our partner. Our job is to import all those names into the common customer database. We need to make sure all names are in right case and to create email address for each user. And import the data to database.
The file (or similar) may be found in the DataMinder Internal Plugin Folder for "DM Basic Plugins" library as {DM_ROOT}/Server/Internal/DMPlugins/DMPluginBasic/testdata/csv/users.csv and accessible from the plugin configuration as: {INSTALL_DIR_ROOT}/testdata/csv/users.csv
| FirstName | LastName |
|---|---|
| ALICE | HILL |
| bob | king |
| ANNE | HaRT |
| jOe | SimS |
| Ieo | bASS |
| Jane | RILEy |
| LINDA | sUtton |
| LaRRy | dAVIs |
| MaRY | blake |
| JacK | HOLT |
A possible workflow may look like this:
To summarize : We just created a process that every hour check if a file exits. If the file exist it reads the contents and saves it in database after fixing format and creating email addresses.
There are many more things we may need to do to have a production quality process e.g. remove file after read, verify user or email is not already stored etc. The point here is we created a non-trivial workflow in minutes without having to do any implementation!
We need to create a simple Web Service API that lets other systems get user data from database just by calling our service with an email address. When called with url like:
https://your_server.com/users/getUser?user=bob@test.com
the web service would return some JSON data the other system can parse e.g to show it on a web page or use it in some other way.
A possible workflow may look like this:
When calling e.g. http://127.0.0.1:9080/users/getAll?email=alice.hill@test.com
The following would be returned:
{
"columns":["FirstName","LastName","Email"]
,
"data":[
["Alice","Hill","alice.hill@test.com"]
]
,
"results":[
{"index":"1","objectType":"Task","objectName":"SELECT FirstName, LastName, Email from UserDatabase.Users","objectId":"8F","result":{"status":"OK","info":""}},
{"index":"2","objectType":"Process","objectName":"Get user by email","objectId":"8B","result":{"status":"OK","info":""}}]}
To summarize : We set up a Web Service API in minutes that connects to a database to retrieve user data and send it back to the requesting service as JSON e.g. a web page.
If other formats or e.g. REST type of urls would be desired then different Service and Plugins may be used.
Runnables
Runnables is the area where things actually happen. By building processes using plugins like:
you can create complex actions and flows.
Group categories in other categories . Add common objects and services to be shared by processes. Add processes with tasks, inputs and outputs to work on data. Let schedulers start processes based on time or listeners react to service calls.
In case you want to implement your own plugins you can easily do that in minutes by following instructions in the Plugin Development section.
Build a process by adding plugins to build desired functionality e.g. plugins that read from a database and manipulates data and then writes to another database. Drag'n Drop plugins to arrange them in desired order.
To create a process a possible flow is
In debug view you can build and run a process task by task. You can see how the data changes by each task run. You can step back and forth in plugin run history. The data is cached for each plugin run meaning that already run tasks do not have to be rerun. If you want to clear the cache just reset the process run to no tasks run.
When building a process and debugging we need only enough rows in table to understand what happens. To avoid much too large data sets, e.g. because of a database query, DataMinder is configured to only use a maximum number of rows during debug. To change the number of rows used in debug view set the dataminder.environment.engine.maxNumberOfRowsInDebugView property in DataMinder.properties file. Default is 200.
If you have a process that gets its initial data from some other system e.g. by a web service call. You may want to save the initial data and during debug re-create it. To create initial data you can:
When the plugins are configured correctly and arranged in the desired order you may start a process in one of the following ways:
Plugins
To find a plugin you can open the top config node or category under the Plugins tab. All plugins at and below that level are then shown. Then you can just do a search in your browser for e.g. "csv".
Collect the plugins you need by adding them to the Toolbox. Later you can Drag'n Drop them to processes and categories (depending on what plugin type it is) in Runnables..
 Monitor
DataMinder was made with extensibility in mind. We don't know all the things you may want to do with it. We tried hard to make plugin development as easy as possible.
You can implement any of the following plugins types depending on what you need to do. Each plugin type solves a different problem.
To create a new Plugin Library create a standard Java JAR file with the implementation of your plugins.
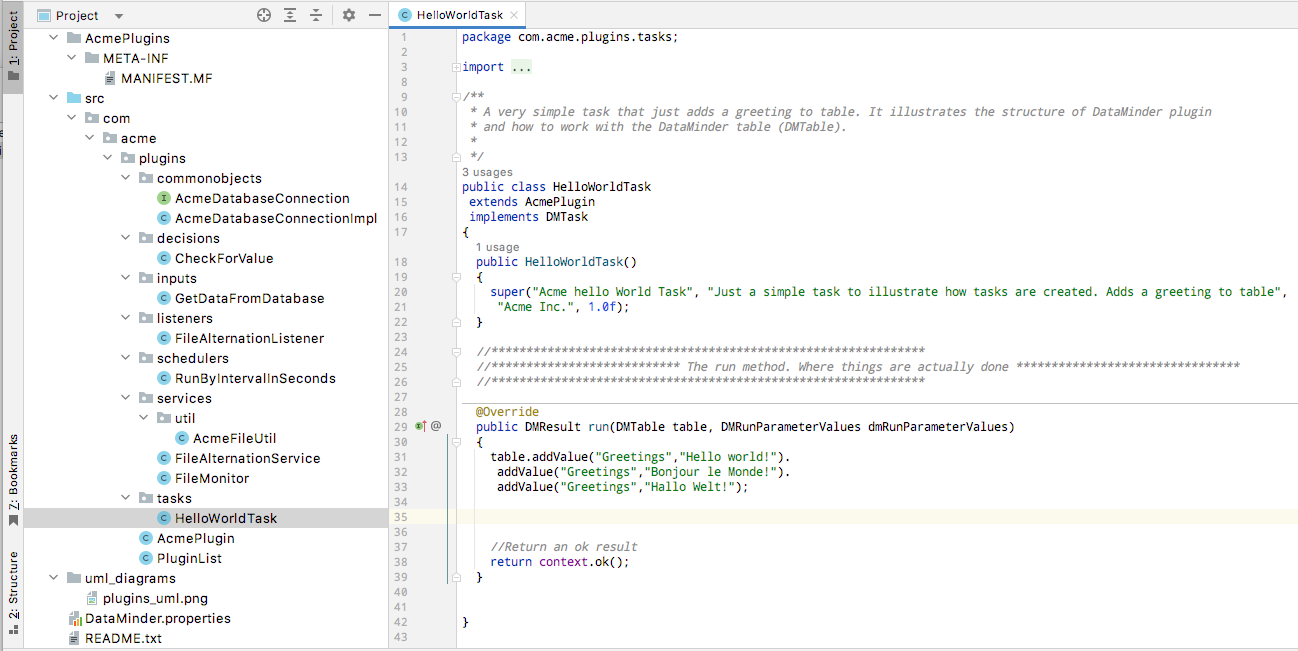
We provide an example implementation of all plugin types to get started.
You can use it as your first implementation.
Download it at our DOWNLOAD page.
To start working with your plugins you need to add our public api jar-file to the project path:
{installation folder}/DataMinder/Server/PluginDevelopment/DMPublicAPI.jar
Now you can create a standard Java JAR (Java Archive) file which contains the following:
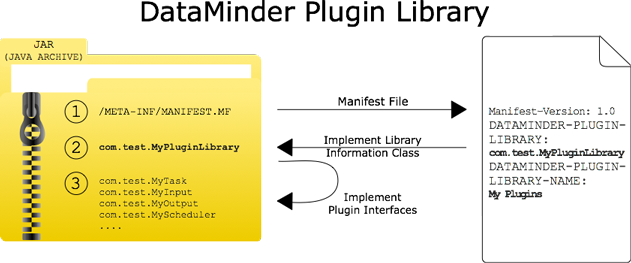 Create Manifest file : META-INF/MANIFEST.MF
Manifest-Version: 1.0
DATAMINDER-PLUGIN-LIBRARY: com.test.MyPluginLibrary
DATAMINDER-PLUGIN-LIBRARY-NAME: My Plugins
com.test.MyPluginLibrary
We have provided a sample implementation of all plugin types. Please download the Sample Plugins implementation to get started. Contains an implementation of all plugin types.
To start develop DataMinder plugins start with the DataMinder Public Plugin API JavaDoc.
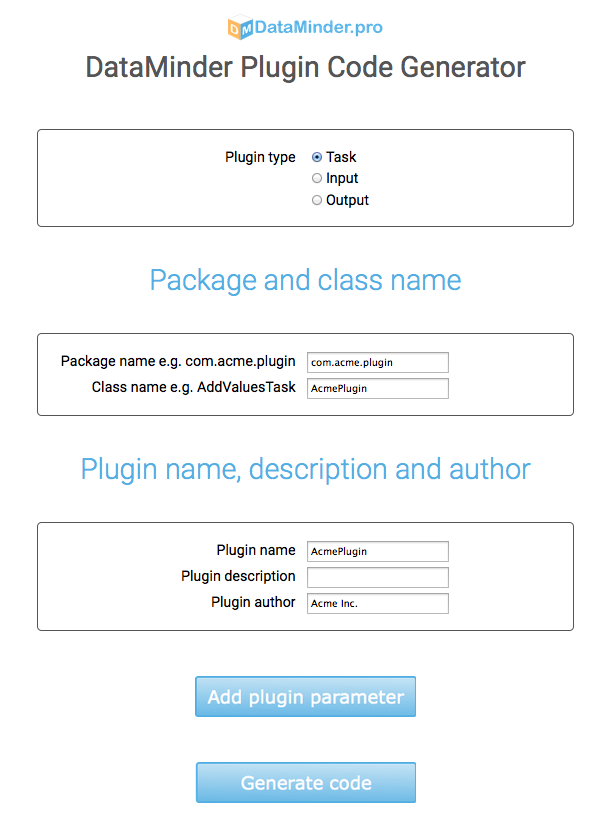
To make plugin creation more easy we created Plugin Code Generation pages online to to quickly
generate a Plugin code + MANIFEST.MF file + DMPluginLibrary object to start developing.